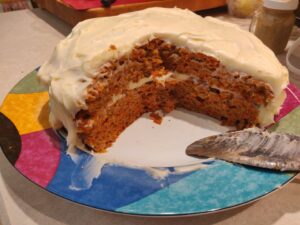
YES! This is my first attempt at anything “gluten free”!
What did I make? Well today, March 12, just happens to be my hubby’s 50th birthday! (Happy Birthday Joel!)
I made a carrot cake! so let’s get right down to what I did!

It should be noted that I read so much about “Gluten Free” flour for MONTHS before I made my decision and purchased the blend I chose. I was a bit hesitant as everything I have tasted in the past that is gluten free tasted…..well…. like cardboard! Everything I read said the balance of ingredients is very important with gluten free products, so I thought, well, I can always feed it to the chickens!
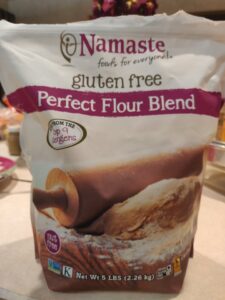
First let’s talk about the flour blend I chose. I learned thru research that with most gluten free baked goods, you need to add xanthan gum unless your flour already has it. When I chose my flour blend, I decided to go with “Namaste” gluten free perfect flour blend. It has tons of great reviews, and most of them said after trying many blends this flour held up the best, tasted the best and had a good mixture of ingredients that work well together. It also contains Xanthan gum, so that will be one less thing you need to have in your pantry!

I put all my dry ingredients into my stand mixer and mixed for just about a min to make sure there were no chunks in my brown sugar, as I make my own brown sugar! You should too! it’s simple to do!
Once I had that done, I added my room temp eggs, homemade vanilla extract and light olive oil (you need a more neutral oil for this), along with ACV and coconut milk (this cake is dairy free as well)
I put all the liquid ingredients in with the dry and mixed on slow speed for a couple mins.
I then took the bowl off the mixer and added my carrots, poured it into my 2 rounds that I had put parchment paper in. It is at this point you will want to add any nuts if you choose! then I baked them!
WOW did this ever come out delish!! soft, moist and airy and tasty! I will say that next time (YES THERE WILL BE A NEXT TIME) I will add extra cinnamon and nutmeg. Thru my research I learned that gluten free has to have a perfect balance, but in making this I know I can add the extra spices without causing a problem in the cake itself!
For the frosting I used a recipe that I have had forever, I LOVE cream cheese frosting, but I do NOT like really sweet frosting! and this recipe is just awesome! it’s more of a buttercream cheese frosting than anything else!
Would love to hear your feedback if you decide to make this cake! for me… I love it!
HERE IS THE RECIPE:
Ingredients
For the cake
- 2 ¼ cups All purpose gluten free flour blend of your choice. (I used namaste flour blend as shown above)
- 1 teaspoon xanthan gum: omit if your blend already contains it
- 1 teaspoon baking soda
- 1 ½ teaspoons baking powder
- ½ teaspoon kosher salt
- 2 teaspoons ground cinnamon (I will use 4 teaspoons)
- 2 teaspoons ground nutmeg (I will use 4 teaspoons)
- ¾ cup granulated or cane sugar (if using stevia make sure its cup for cup blend)
- ½ cup packed light brown sugar
- ½ cup neutral oil (like light olive or sunflower)
- 4 eggs at room temperature (I used our fresh eggs from our hens)
- 1 teaspoon apple cider vinegar (I used homemade)
- ½ cup milk at room temperature (for dairy free I used unsweet coconut milk)
- ½ cup chopped pecans plus more for decorating (optional)
- 3 to 3.5 cups peeled and grated carrots (from about 4 large carrots)
For the cream cheese frosting
- 8 ounces cream cheese at room temperature
- 10 tablespoons unsalted butter at room temperature
- ¼ teaspoon kosher salt
- 3 to 4 cups powdered sugar (or to taste. I found you need at least 3 cups for consistency)
Instructions-
Preheat your oven to 350°F. Grease two 8-inch round baking pans and set them aside. I lined with parchment paper
-
In a large bowl, place the flour, xanthan gum, if using, baking soda, baking powder, salt, cinnamon, nutmeg and sugar of your choice, (if using stevia, make sure to get correct conversion measurment) Whisk to combine well. Add the brown sugar, and whisk again to combine, and to break up any lumps in the brown sugar.
-
Add the oil, eggs, vinegar, and milk, and mix to combine. Add the (optional) pecans and mix until even
-
Add the grated carrots to the mixture and stir until evenly distributed throughout the batter. The batter will be thick, but relatively soft.
To make a cake (two rounds or 9×13)
-
Divide the batter evenly among the two prepared baking pans and spread into an even layer in each. Or pour into baking dish.
-
Place in the center of the preheated oven and bake until the cake is uniformly light brown on top and beginning to pull away from the sides of the pan (35 to 40 minutes). Use a toothpick or butter knife, it should come out clean when cake is done,
-
Remove from the oven and allow to cool for at least 10 minutes before transferring to a wire rack to fully cool
-